In recent years, the use of CCTV (closed-circuit television) cameras has become increasingly popular for security and surveillance purposes. With the advancement of technology, CCTV cameras have also evolved, and the use of DDNS (dynamic domain name system) has become more common in CCTV installations.
DDNS allows for the remote access and control of CCTV cameras, making it easier for users to monitor and manage their security systems. However, with the constantly evolving technology, it is important to upgrade your CCTV DDNS to ensure optimal performance and security.
This article will provide best practices and considerations for upgrading your CCTV DDNS to help you make informed decisions and avoid potential issues. We will discuss the benefits of upgrading, factors to consider before upgrading, and steps to take during the upgrade process.
Contents
Best Practices for Upgrading Your CCTV DDNS
Upgrading your CCTV DDNS can be a daunting task, but with the right approach and best practices, it can be a smooth process. Here are some tips to consider when upgrading your CCTV DDNS:
1. Research and Choose a Reliable DDNS Provider
When upgrading your CCTV DDNS, it’s crucial to choose a reliable DDNS provider. Do your research and choose a provider that has a proven track record of reliability, security, and uptime. Look for reviews and testimonials from other users, and check if the provider has any certifications or awards.
2. Plan and Prepare Your Upgrade
Before upgrading your CCTV DDNS, plan and prepare your upgrade carefully. Make a backup of your existing DDNS configuration and settings, and ensure that you have all the necessary information and credentials for your new DDNS provider. Create a detailed plan for the upgrade, including timelines, milestones, and contingency plans in case of unexpected issues.
3. Communicate and Coordinate with Your Team
Upgrading your CCTV DDNS can affect multiple teams and stakeholders, including your IT team, security team, and end-users. Ensure that you communicate and coordinate with all relevant parties before and during the upgrade process. Provide clear instructions and guidelines, and address any concerns or questions they may have.
4. Test and Verify Your New DDNS Configuration
Once you have upgraded your CCTV DDNS, it’s essential to test and verify your new DDNS configuration thoroughly. Check if all your cameras and devices are connected and accessible, and verify if your new DDNS provider is resolving your domain names correctly. Conduct a series of tests and simulations to ensure that your new DDNS is working as expected.
5. Monitor and Maintain Your CCTV DDNS
After upgrading your CCTV DDNS, it’s crucial to monitor and maintain your DDNS regularly. Set up monitoring tools and alerts to detect any issues or anomalies with your DDNS, and establish a regular maintenance schedule to update and patch your DDNS software and hardware. Regularly review your DDNS logs and performance metrics, and optimize your DDNS configuration for better security, performance, and usability.
Considerations When Upgrading Your CCTV DDNS
When upgrading your CCTV DDNS, there are several considerations that you should keep in mind to ensure that the process goes smoothly and that you end up with the best possible result. Here are some of the key considerations:
1. Compatibility with Your Existing System
Before upgrading your CCTV DDNS, it’s important to check whether the new system will be compatible with your existing setup. You don’t want to invest in a new DDNS solution only to find out that it doesn’t work with your current cameras, NVR, or other components.
2. Scalability
Another important consideration is scalability. If you plan to add more cameras or expand your system in the future, you should choose a DDNS solution that can easily accommodate your future needs. Make sure that the solution you choose can support the number of cameras and devices you plan to add in the future.
3. Security Features
Security is always a top concern when it comes to surveillance systems, and DDNS solutions are no exception. Make sure that the DDNS service you choose has strong security features, such as two-factor authentication, encryption, and regular software updates to protect against vulnerabilities and cyber threats.
4. Ease of Use
You should also consider the ease of use of the DDNS solution you choose. Look for a system that is user-friendly and intuitive, with clear instructions and an easy-to-navigate interface. This will make it easier for you to set up and manage your system, reducing the risk of errors and downtime.
5. Cost
Finally, cost is always a consideration when it comes to upgrading your surveillance system. DDNS solutions can vary widely in price, so it’s important to choose one that fits your budget while still meeting your needs. Keep in mind that the cheapest option may not always be the best, as you may sacrifice functionality, security, or scalability for a lower price.
By keeping these considerations in mind when upgrading your CCTV DDNS, you can ensure that you choose the right solution for your needs and that the process goes smoothly from start to finish.
Step-by-Step Guide to Upgrading Your CCTV DDNS
Now that you understand the best practices and considerations for upgrading your CCTV DDNS, it’s time to walk through the process step-by-step. Follow these instructions to ensure a smooth and successful upgrade.
- Research and select a new DDNS provider
- Look for a reputable provider with a strong track record of uptime and reliability.
- Consider the features and functionality that are important to you, such as integration with other security systems or mobile app access.
- Compare pricing and subscription options to find the best fit for your budget.
- Create a new DDNS account
- Sign up for an account with your chosen provider.
- Follow the prompts to set up your account and verify your email address.
- Update your CCTV system settings
- Log in to your CCTV system’s settings menu.
- Locate the DDNS section and enter your new DDNS account information.
- Save the changes and exit the settings menu.
- Update your router settings
- Log in to your router’s settings menu.
- Navigate to the port forwarding section and update the settings for your CCTV system.
- Update any firewall or security settings as needed to allow access to the new DDNS.
- Test your new DDNS
- Open a web browser and enter your new DDNS URL.
- Verify that you are able to access your CCTV system remotely.
- Check that all features and functionality are working as expected.
- Monitor for issues
- Keep an eye on your CCTV system’s performance in the days and weeks following the upgrade.
- Report any issues or errors to your DDNS provider and work with them to resolve the problem.
By following these steps, you can upgrade your CCTV DDNS with confidence, knowing that you have chosen a reliable provider and taken all necessary precautions to ensure a smooth transition.
Top Easiest Alternatives of IP Cameras DDNS Service
While DDNS service can be a convenient way to access your IP cameras remotely, it may not always be the easiest or most reliable option. Luckily, there are alternative solutions that you can consider. Here are some of the top easiest alternatives to IP cameras DDNS service:
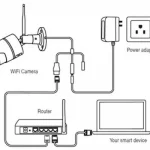
- P2P Cloud Service: Many P2P IP security cameras come with built-in P2P (peer-to-peer) cloud service. P2P cloud service uses a unique ID and password to establish a direct connection between your IP camera and your smartphone or computer, allowing you to access your IP camera remotely without the need for a DDNS service. The P2P cloud service is easy to set up and use, and it does not require any port forwarding or router configuration.Below we will take ZOSI C296 as an example to show you how easy the P2P security camera setup is.
C296 - Pan Tilt IP Security Cameras
- 4K Ultra HD/5MP Super HD
- Starlight Color Night Vision
- Pan & Tilt
- PoE/WiFi Connection
- Light & Siren Alarm
- Upgraded AI-Powered Detection
- 2-Way Audio
- VPN Service: If you are concerned about the security of your IP camera, you can set up a VPN (virtual private network) to access your IP camera remotely. A VPN creates a secure and encrypted tunnel between your remote device and your local network, allowing you to access your IP camera as if you were on the same network. While setting up a VPN requires some technical knowledge, it provides a highly secure and reliable way to access your IP camera remotely.
- Dynamic DNS Service: Similar to DDNS service, a dynamic DNS (Domain Name System) service can help you access your IP camera remotely by assigning a unique hostname to your IP address. However, dynamic DNS service does not require you to set up port forwarding, and it can work with many different types of devices, including IP cameras. Dynamic DNS service is often provided by third-party companies, and some IP cameras come with built-in support for dynamic DNS.
- Remote Access Software: There are many different types of remote access software available that can help you access your IP camera remotely. Some examples include TeamViewer, AnyDesk, and Chrome Remote Desktop. Remote access software allows you to control your remote device as if you were sitting in front of it, making it easy to access your IP camera remotely.

By considering these alternatives, you can find an easier and more reliable way to access your IP camera remotely without relying on a DDNS service.
To enhance the security of accessing security cameras remotely, you can implement various measures like firmware updates and password changes. For additional strategies to safeguard IP cameras with DDNS against hackers, refer to this post.
Useful Troubleshooting Tips
Even with the best practices and considerations in mind, sometimes issues can arise when upgrading your CCTV DDNS. Here are some useful troubleshooting tips to help you resolve any problems that may occur:
- Check your network connection: Ensure that your network connection is stable and strong. If your connection is weak, it may cause issues when upgrading your CCTV DDNS.
- Verify your login information: Double-check that you have entered the correct login information for your DDNS provider. Incorrect login information can prevent you from accessing your CCTV system remotely.
- Verify your port forwarding settings: Check that your port forwarding settings are correctly configured for your new DDNS provider. Incorrect settings can cause issues with remote access to your CCTV system.
- Restart your router: If you are experiencing connectivity issues, try restarting your router. This can sometimes resolve issues with network connectivity.
- Contact your DDNS provider: If you have tried all of the above troubleshooting tips and are still experiencing issues, contact your DDNS provider for support. They may be able to assist you with resolving any technical issues.
By following these troubleshooting tips, you can quickly resolve any issues that may arise when upgrading your CCTV DDNS and ensure that your CCTV system is up and running smoothly.
Conclusion
Upgrading your CCTV DDNS is an essential task to ensure the security of your surveillance system. By following the best practices and considerations outlined above, you can make the transition to a new DDNS smoothly and efficiently. Remember to plan and prepare before making any changes to your system, and always keep security as your top priority. With proper care and attention, you can upgrade your CCTV DDNS and enjoy enhanced security and functionality for your surveillance system.