As HDR (High Dynamic Range) content becomes more common in everything from movies to smartphone videos and even security footage, it’s important to understand how it interacts with SDR (Standard Dynamic Range) displays and software. In many scenarios—such as sharing clips on social platforms, archiving video, or viewing on older monitors—converting HDR to SDR is not only useful, but necessary.
In this article, we’ll explore the key differences between HDR and SDR, why this conversion may be required, and how you can carry it out effectively using different tools and methods.
Contents
Understanding HDR and SDR
1. What is HDR?
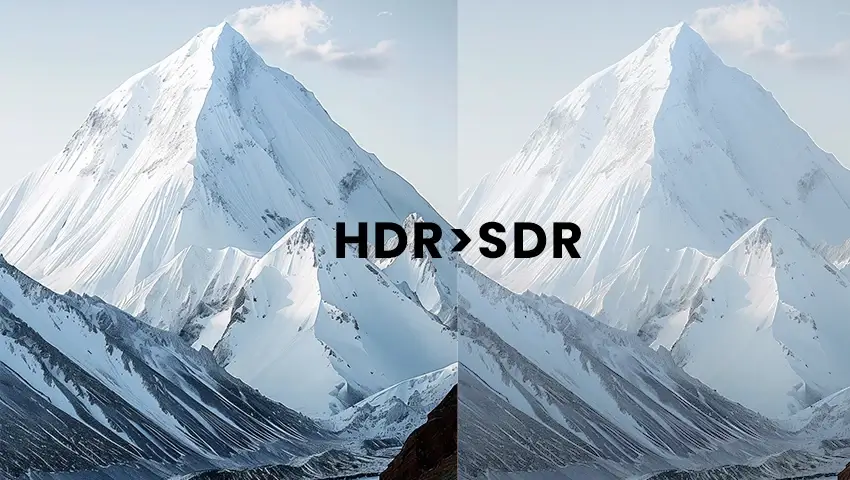
HDR, or High Dynamic Range, refers to a technology that enhances the visual quality of video or images by increasing the range between the darkest shadows and the brightest highlights. This results in more vivid colors, greater detail in both bright and dark areas, and an overall more lifelike appearance.
HDR content is typically recorded and displayed using advanced standards such as:
- HDR10: The most widely adopted open HDR format.
- HLG (Hybrid Log-Gamma): Designed for broadcast and compatibility.
- Dolby Vision: A dynamic format with scene-by-scene metadata for optimal presentation.
HDR content often uses the Rec. 2020 color space and PQ (Perceptual Quantizer) or HLG gamma curves for tone reproduction.
2. What is SDR?
SDR, or Standard Dynamic Range, has been the traditional format for video and image playback. It operates within a narrower brightness and color range. SDR uses the Rec. 709 color space and standard gamma curves that most older TVs, monitors, and web platforms are optimized for.
While SDR is more universally compatible, it lacks the visual richness and clarity of HDR, especially in high-contrast scenes.
Why Convert HDR to SDR?
Converting HDR to SDR is often necessary due to hardware limitations, software compatibility, or content-sharing constraints. Here are some common reasons:
1. Device Compatibility
Many older displays and TVs do not support HDR content. Playing HDR video on non-HDR screens can result in dull, washed-out, or overly bright visuals. Converting to SDR ensures that content is displayed correctly and consistently.
2. Video Editing Workflows
Not all video editing software is optimized for HDR workflows. Converting to SDR simplifies editing, especially for color grading and effects, which are often calibrated for SDR formats.
3. Platform Limitations
Some social media and video hosting platforms either do not support HDR or compress it in a way that degrades quality. Converting to SDR ensures broader compatibility and consistent appearance when shared online.
4. Archiving and Sharing Footage
If you’re exporting footage—such as from a ZOSI HDR-capable security camera—you may need to convert it to SDR for archival purposes or to share with individuals or authorities who may not have HDR-capable playback devices.
How HDR to SDR Conversion Works
Converting HDR to SDR is more complex than simply lowering brightness. It involves several technical processes to ensure the dynamic range, color accuracy, and overall appearance are preserved as much as possible.
1. Tone Mapping
Tone mapping compresses the wide brightness range of HDR content into SDR’s narrower range. This is a crucial step to avoid clipping in highlights and shadows, which can make footage look unnatural.
2. Color Space Conversion
HDR video typically uses the Rec. 2020 color gamut, while SDR uses Rec. 709. Accurate color space conversion ensures that colors appear as intended after the conversion.
3. Gamma Adjustment
HDR content uses PQ or HLG gamma curves to define luminance. These need to be converted to the standard gamma curves used in SDR displays to maintain appropriate contrast.
4. Bit Depth and Brightness Management
HDR often works in 10-bit color or higher, while SDR is usually 8-bit. This downsampling must be managed carefully to minimize banding and detail loss.
How to Convert HDR to SDR: Step-by-Step Guides
Method 1: Using HandBrake (Free & Beginner-Friendly)
Step 1: Install HandBrake
Download from https://handbrake.fr and install it.
Step 2: Import HDR Video
Open HandBrake and drag your HDR video into the interface.
Step 3: Choose a Preset
Select a preset like “Fast 1080p30” or “HQ 1080p30” from the right-hand panel.
Step 4: Enable Tone Mapping
- Go to the Filters tab.
- Find Tone Mapping and set it to “enabled”.
- Set Tone Mapping Method to Hable or Reinhard for natural-looking results.
Step 5: Adjust Color Space
Under the Video tab:
- Set Video Codec to H.264 or H.265.
- Choose Color Matrix = BT.709, Color Primaries = BT.709, and Transfer Function = BT.709.
Step 6: Export the Video
- Click Browse to choose an output location and filename.
- Click Start Encode to begin the conversion.
Method 2: Using FFmpeg (Advanced Users & Batch Processing)
Step 1: Install FFmpeg
Download and install from https://ffmpeg.org.
Step 2: Open Terminal or Command Prompt
Navigate to the folder where your video is located.
Step 3: Use Command for Conversion
ffmpeg -i input_hdr.mp4 -vf “zscale=transfer=bt709:primaries=bt709:matrix=bt709,tonemap=tonemap=hable” -c:v libx264 -crf 18 -preset slow output_sdr.mp4
Explanation of the command:
- zscale: Converts color space and gamma
- tonemap=hable: Applies HDR-to-SDR tone mapping
- crf 18: High-quality output (lower = better)
- preset slow: Optimizes file size and quality balance
Step 4: Verify Output Open the output video in an SDR monitor or player to check the tone and color balance.
Method 3: Using Adobe Premiere Pro (Professional Editing)
Step 1: Import HDR Footage
- Create a new project.
- Import your HDR video clip.
Step 2: Interpret Color Space
- Right-click the clip in the Project panel > Modify > Interpret Footage.
- Under Color Management, choose “Rec. 2100 HLG” or “Rec. 2100 PQ” based on your footage.
Step 3: Add to SDR Timeline
- Create a new sequence.
- Set working color space to Rec. 709.
- Add your HDR clip to the timeline and allow automatic color conversion.
Step 4: Apply Lumetri Correction
- Use the Lumetri Color panel to fine-tune exposure, highlights, and contrast.
- Use a Rec. 2020 to Rec. 709 LUT if needed.
Step 5: Export
- File > Export > Media.
- Set Color Space to Rec. 709.
- Choose your preferred format and export.
Method 4: Using DaVinci Resolve (Precise Color Control)
Step 1: Create a New Project
- Open DaVinci Resolve.
- Go to “Project Settings” > “Color Management.”
Step 2: Set Color Science
- Choose DaVinci YRGB Color Managed.
- Set Input: Rec. 2100 HLG or PQ, Timeline: Rec. 709, Output: Rec. 709 Gamma 2.4.
Step 3: Import Footage Drag your HDR footage into the media pool.
Step 4: Grade and Tone Map Use the Color tab to adjust tone mapping manually or apply LUTs to match SDR appearance.
Step 5: Export
- Go to the Deliver tab.
- Choose MP4 or MOV, H.264/H.265, and verify export settings are SDR-compatible.
Tips for a Smooth Conversion
1. Keep a Backup: Always retain a copy of the original HDR file.
2. Use a Calibrated Display: This ensures what you see while editing is accurate.
3. Avoid Overcorrection: HDR footage can look overly bright or dark if tone mapping is too aggressive.
4. Batch Convert: If converting multiple files, use batch processing in FFmpeg or HandBrake to save time.
5. Check Metadata: Make sure your video’s color profile is correctly flagged as SDR after conversion.
Conclusion
Converting HDR to SDR doesn’t have to be complicated. With the right tools and settings, you can ensure your footage looks its best—no matter where or how it’s being viewed. Whether you’re a content creator, editor, or ZOSI security camera user, these step-by-step methods give you the flexibility to make your content more accessible and reliable.