Setting up an IP camera network can be perplexing to those new to the field, resulting in several questions such as “What is an IP camera?” “How does it work?” “How do I configure my IP camera network?” and “What is my camera’s IP address and port number?”
In this IP camera network configuration tutorial, you will receive answers to all questions regarding IP camera configuration and begin video monitoring right away.
Furthermore, configuring an IP camera can be incredibly simple, whether with or without a router! Additionally, cameras can record, save videos, and stream live views even without IP camera configuration. If you’re unfamiliar with technology and looking for a plug-and-play IP camera, be sure to explore these solutions.
Contents
What Is an IP Camera
An IP camera, also known as an internet protocol camera, operates by establishing a direct connection to the internet, thus allowing it to send and receive data through the internet.
Once you have configured your IP camera correctly, you may connect to it through your mobile devices (such as your phone, PC, or tablet) via your network. This means you can view live feeds, get notifications, and check camera recordings from anywhere, whether inside or outside your home network.
The transmission of data from the IP camera depends on the address assigned to it by the router or NVR. You will typically need to find the correct IP camera address to access the camera on the internet.

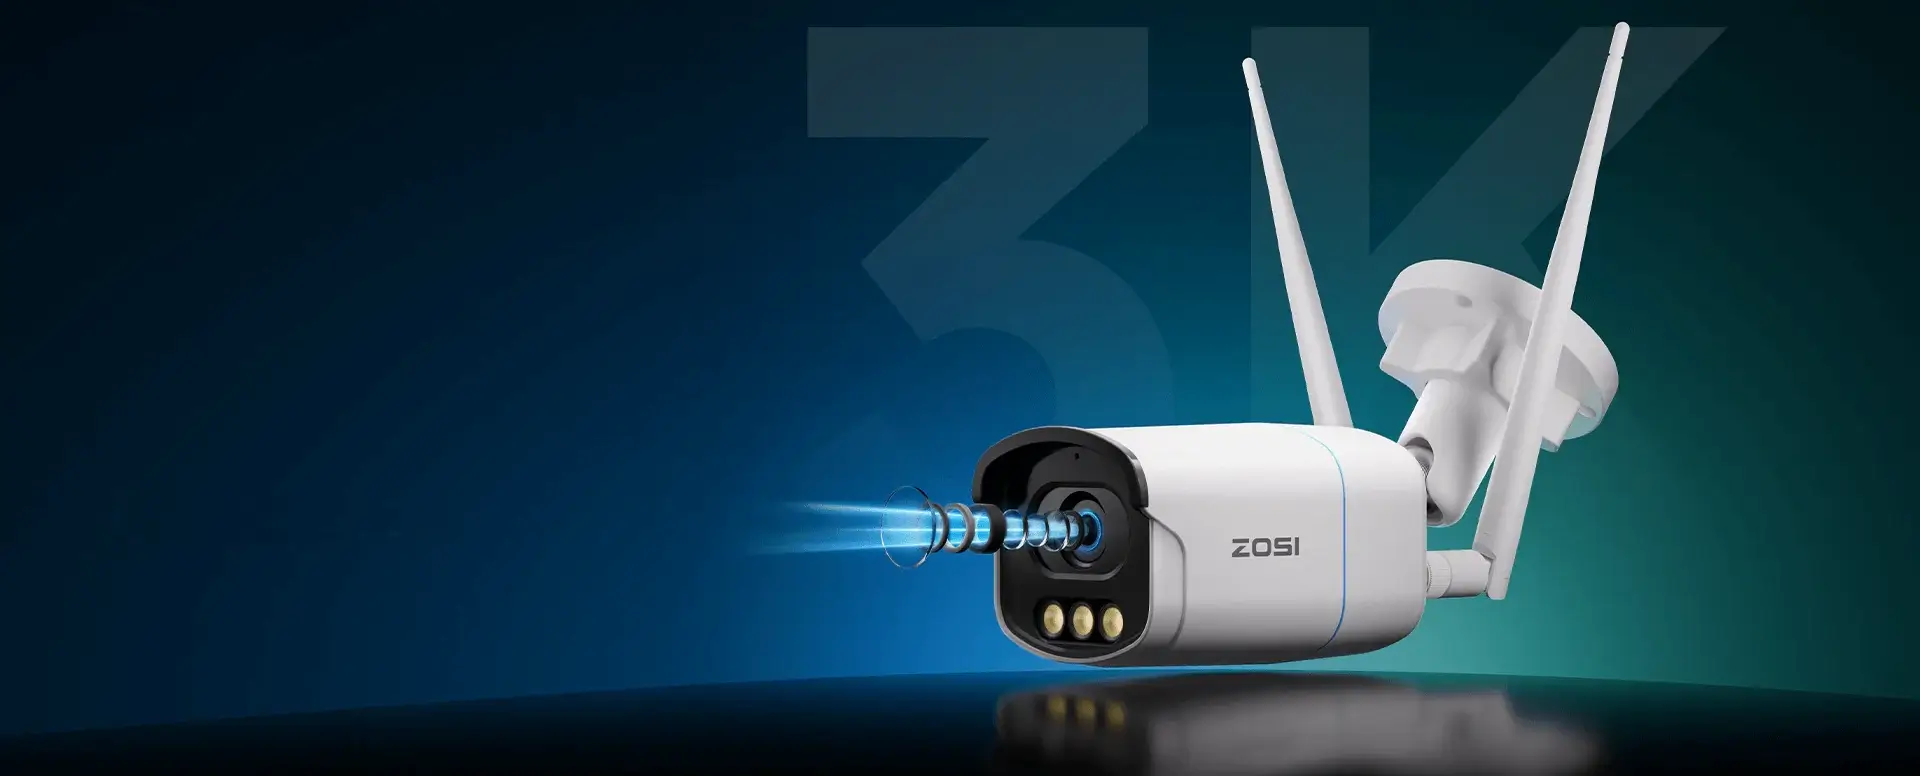
5MP AuroraLux Security Camera - C186
- 3K/5MP Super HD
- AuroraLux True Color Night Vision
- 3000K Neighbor-Friendly Warm Light
- Smart Person/Vehicle Detection
- Light & Siren Deterrence
- Two-Way Audio Talk
- 128GB SD & PoE NVR
- IP66 Waterproof Design
IP Camera Configuration Guide
Configuring an IP camera involves finding its specific IP address, which is its unique identifier among the numerous devices connected to the same network.
However, the steps involved in installing and configuring IP cameras on the local area network (LAN) may vary slightly from those in the wide-area network (WAN). Regardless, the cameras must be connected to the network so that they can be accessed.
The process of setting up an IP camera and network can be divided into three parts.
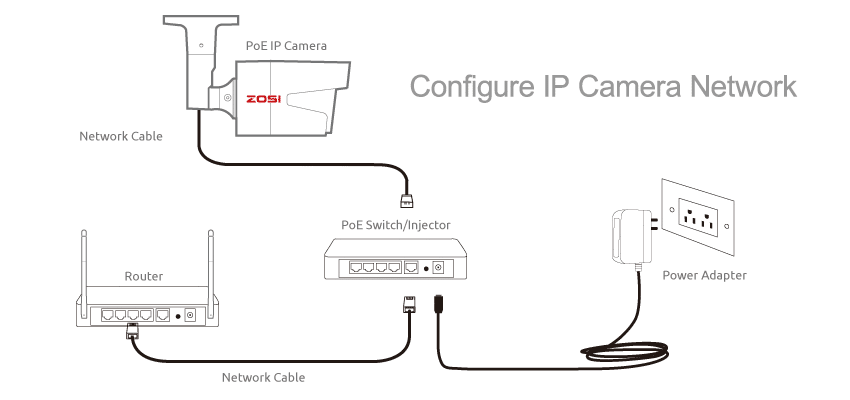
Step 1. Configure IP Camera Network
You must ensure that both your monitoring devices and CCTV cameras (and NVR) are attached to the same home network before you begin the IP camera configuration, either with or without a router.
Check full explanation of security camera connection here.
Step 2. IP Camera Configuration on LAN
You need to determine the local IP address of the CCTV camera to configure IP cameras on LAN, such as a typical home network.
Previously we introduced 3 ways for you to do that.
Step 3. CCTV Camera Configuration on WAN
Finally, configuring an IP camera on the WAN usually involves port forwarding, which necessitates the local IP address of the camera, HTTP and RTMP port numbers, and WAN IP address.
What is port forwarding?
Port forwarding essentially transfers your local IP address into a public one that is used to access a specific camera on a wide area network (WAN), such as crossing neighborhoods or even countries.
Follow the detailed steps in our previous post for easy IP camera configuration.
Shortcut to IP Camera Configuration
Are you confused by the technical terms mentioned in the IP camera configuration steps above?
Is there an easier way for individuals with only a basic understanding of the internet to configure an IP camera?
The answer is a resounding YES.
P2P technology has made IP camera configuration easy for beginners. P2P security cameras, including both wireless cameras and wired PoE security systems, are designed to save you the trouble of fixing the IP address for stable remote viewing.
So, what is P2P, and how do you set up an IP camera on the internet with P2P technology?
To put it simply, each P2P-enabled security camera is registered at the developer-level P2P server and identified with a unique ID number (UID). Thus, every time you want to access the camera locally or remotely, you only need to ping the P2P server with the camera UID via the security camera software.
Setting up a P2P IP camera configuration requires only three simple steps:
- Download and install the IP camera configuration software ZOSI Smart App on your phone or PC.
- Launch the ZOSI App or Client and enter the UID to add the security camera.
- Click on the camera in the software, and the CCTV camera’s configuration is complete. You can now view the live footage both within and outside your home network.
Is IP camera configuration secure via the P2P server?
P2P technology is not new and is widely used in many fields, including Skype. Also, reputable brands like ZOSI have adopted multiple methods to ensure the security of data transmission, including using various servers and advanced encryption techniques.
So, if you’re searching for an IP camera with an easy setup, a P2P camera won’t disappoint you. Consult the IP camera client manual for a more detailed guide with screenshots of every setup step.
IP Camera Wired & Wireless Connection
Taking the ZOSI outdoor IP camera for example, below are the three ways to accomplish the security camera setup via Android smartphone.
1. Wired Connection


- Charge your wireless security camera with the power adapter.
- Use an RJ45 cable to connect the camera to the network.
- Download the free security camera software ZOSI Smart.
- Enter camera UID (scan QR Code on the sticker) and password (default password: “admin”) to add the camera device; tap “+” at the upper right corner to complete.
- Tap the screen and then you can view the IP camera over the Internet.
2. Convert Wired Connection to Wireless Connection
If you have added the camera to the Zosi Smart App successfully and want to change from wired connection to wireless connection, then follow the steps presented below:


- Tap the “Settings” button at the upper right corner of the viewing screen and select “WiFi Setting” to proceed with wireless configuration.
- Select network and enter the corresponding WiFi password
- Tap “Confirm” to finish the WiFi settings and unplug the network cable.
- Tap the screen and then you can view the IP camera via wireless connection.
Wireless Connection

- Charge your wireless security camera with the power adapter.
- Download the free security camera software ZOSI Smart.
- Tap “WiFi Smartlink” on the device adding page and enter the corresponding WiFi password.
- Choose “Manual Config” to search the corresponding camera device (the searching process may take 1-2 minutes; camera without a built-in speaker will not hear the voice prompt).
- Select the corresponding camera device (using UID); enter the camera UID and password on the device adding page.
- Tap the screen and then you can view the IP camera over Internet.
Here is an operation guide video to show you how to connect the ZOSI IP camera.

Note: The above steps apply to the connection of ZOSI non-battery powered wireless IP security cameras. Cameras from other brands may have different rules.
CCTV Camera Without Configuration
If you want to make IP camera configuration even easier, you can skip the IP camera setup altogether by using an NVR security camera system instead.
The configuration of DVR/NVR camera surveillance is slightly different.
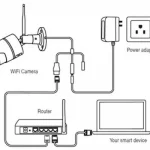
The good news is that if you only want the cameras to record and save footage on the network video recorder (NVR), you won’t need to perform an IP camera configuration with NVR.
This is because once the NVR and the cameras connected to it are powered up, they will automatically create a private network. Within this subnet, cameras and the NVR can communicate with each other without any need to connect to a router or perform IP camera configuration.
For instance, the ZOSI W4 Pro can save you the hassle of configuring your IP camera NVR and offer you 24/7 protection. Check out the NVR CCTV camera setup in this diagram:
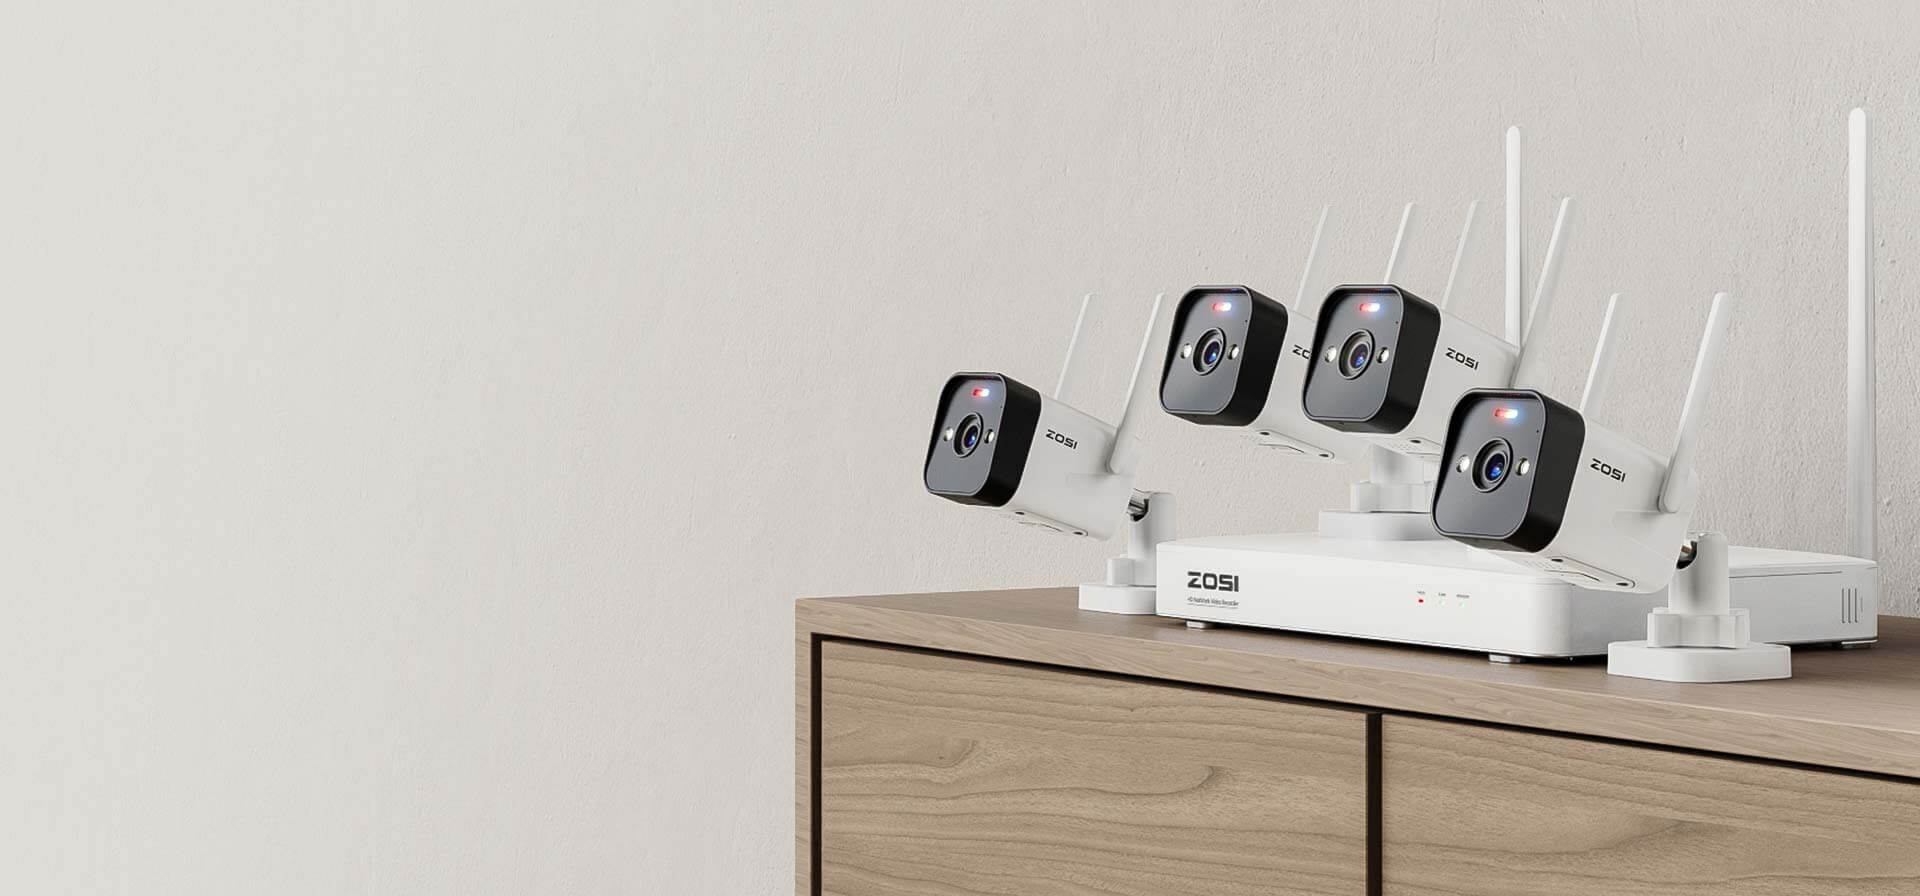
3MP Home Wi-Fi Mesh Security Camera System - W4 PRO
- AI Human Detection
- Light & Siren Alarm
- Mesh Wi-Fi
- 2 Way Audio
However, if you require remote viewing, such as accessing the cameras on your phone or receiving push notifications, you will still need to add the cameras to the surveillance software with the help of a router. (Don’t forget that P2P technology can simplify the CCTV camera system configuration.)
If you have any questions regarding IP camera configuration or remote access, feel free to comment below, and I will respond shortly.